> ## Documentation Index
> Fetch the complete documentation index at: https://docs.versori.com/llms.txt
> Use this file to discover all available pages before exploring further.
# Connecting
Connections link your integration to external systems by providing the credentials and configuration needed to
authenticate API requests. Each connector in your project can have one or more connections, allowing you to target
different environments or users with separate credentials while sharing the same integration logic.
This guide covers how to create and manage connections in the Connect tab. For details on specific authentication
methods, see [Authentication Methods](/latest/guides/auth-methods/introduction). For a deeper understanding of how
connectors and connections work within the platform, see [Connectors](/latest/concepts/connectors) and
[Connections](/latest/concepts/connections).
## Connections vs embedded connections
Before creating a connection, it is important to understand the two types available.
A **connection** stores credentials that you provide directly — such as an API key or OAuth2 tokens. The credentials
belong to your organisation and are used when the integration runs on your behalf. This is the standard approach when
you control the target system.
An **embedded connection** does not store credentials itself. Instead, it defines the authentication method and allows
external users of your integration to connect with their own credentials. Users can be activated via the Users tab or
through an external web app configured to use Versori APIs. Use embedded connections when you are building an
integration that other people or organisations will authenticate individually.
For a deeper look at the concept and common use cases, see
[Embedded connectors](/latest/guides/getting-started/connect/embedded-connectors).
| | Connection | Embedded connection |
| --------------- | ------------------------------------ | ------------------------------------------------ |
| **Credentials** | Stored directly by you | Provided by each external user |
| **Use case** | Internal integrations, single-tenant | Multi-tenant, customer-facing integrations |
| **Activation** | Immediate — ready once created | Users activate via the Users tab or Versori APIs |
If you are building an integration for your own use, start with a standard connection. Switch to an embedded
connection when you need external users to authenticate with their own credentials.
## Selecting an authentication type
When creating a new connection, you first choose an authentication type that matches how the target API expects requests
to be authenticated. The platform supports the following types:
 | Type | When to use |
| -------------------------------- | ----------------------------------------------------------------------------- |
| **API Key** | The API authenticates via a key sent in a header, query parameter, or cookie. |
| **Basic Auth** | The API requires a username and password sent as a Base64-encoded header. |
| **OAuth2** | The API uses OAuth 2.0 flows (authorization code, client credentials, etc.). |
| **OAuth1** | The API uses the older OAuth 1.0a signing protocol. |
| **HMAC (Webhook Only)** | Incoming webhooks that are verified using an HMAC signature. |
| **None (Bypass Authentication)** | The API requires no authentication. |
If the connector was generated from an OpenAPI specification, the authentication type may already be pre-configured.
You can adjust it when creating a new connection if needed.
## Creating a new connection
A connection requires an authentication method, a name, and the credentials for the target API. If an authentication
method already exists on the connector, you can reuse it; otherwise, you create one inline during the connection setup.
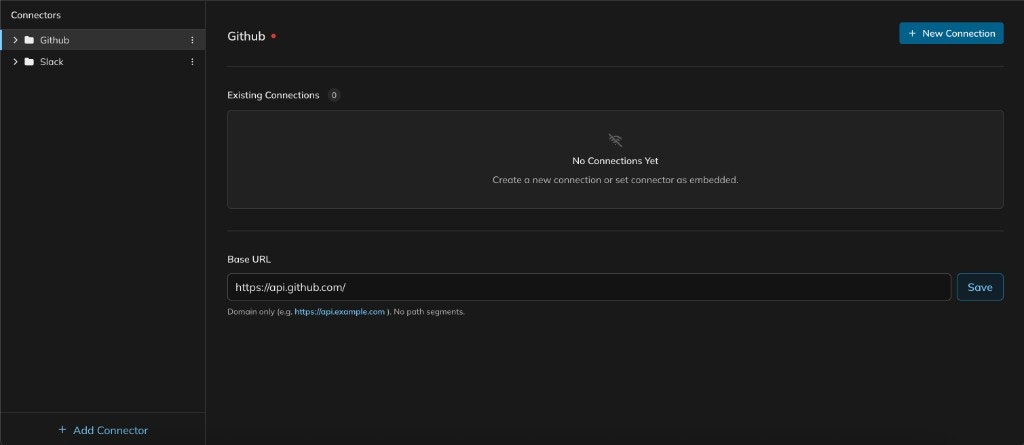
Navigate to the **Connect** tab and select the connector you want to configure. The connector detail view shows
existing connections and the base URL.
| Type | When to use |
| -------------------------------- | ----------------------------------------------------------------------------- |
| **API Key** | The API authenticates via a key sent in a header, query parameter, or cookie. |
| **Basic Auth** | The API requires a username and password sent as a Base64-encoded header. |
| **OAuth2** | The API uses OAuth 2.0 flows (authorization code, client credentials, etc.). |
| **OAuth1** | The API uses the older OAuth 1.0a signing protocol. |
| **HMAC (Webhook Only)** | Incoming webhooks that are verified using an HMAC signature. |
| **None (Bypass Authentication)** | The API requires no authentication. |
If the connector was generated from an OpenAPI specification, the authentication type may already be pre-configured.
You can adjust it when creating a new connection if needed.
## Creating a new connection
A connection requires an authentication method, a name, and the credentials for the target API. If an authentication
method already exists on the connector, you can reuse it; otherwise, you create one inline during the connection setup.
Navigate to the **Connect** tab and select the connector you want to configure. The connector detail view shows
existing connections and the base URL.
 Click **+ New Connection**. The new connection form opens with two sections: **Auth Method** at the top and
**Connection** details below.
Click **+ New Connection**. The new connection form opens with two sections: **Auth Method** at the top and
**Connection** details below.
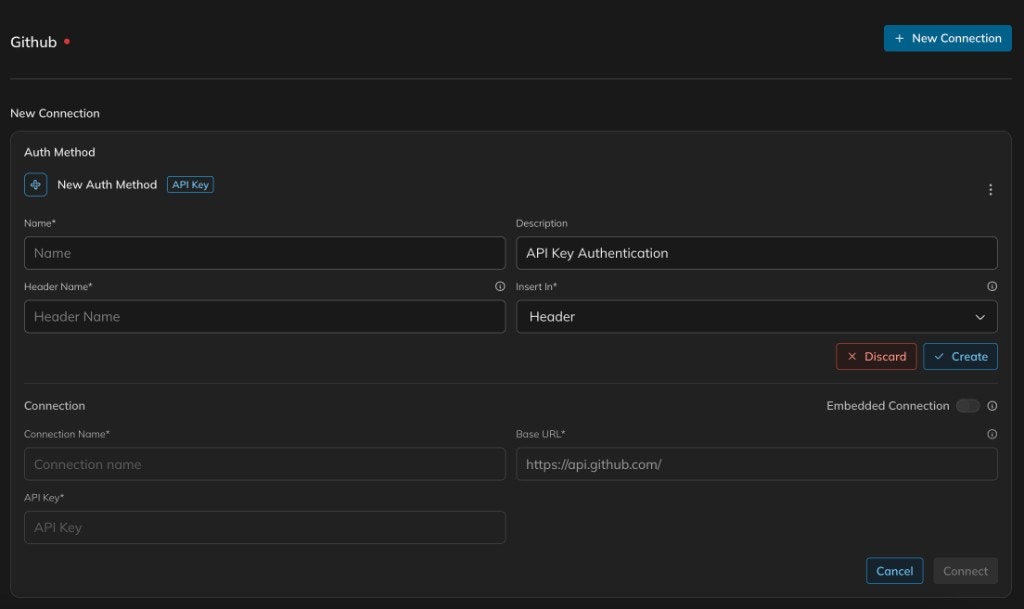 Select an authentication type from the **Auth Method** dropdown. If this is a new auth method, fill in the required
fields — for example, for API Key authentication you provide a name, header name, and where the key is inserted
(header, query, or cookie). Click **Create** to save the auth method.
Enter a **Connection Name**, verify the **Base URL**, and provide the required credentials (e.g. your API key). If
you want external users to authenticate with their own credentials instead, enable the **Embedded Connection**
toggle.
Click **Connect** to create the connection. The connector now shows the active connection with its authentication
details.
Select an authentication type from the **Auth Method** dropdown. If this is a new auth method, fill in the required
fields — for example, for API Key authentication you provide a name, header name, and where the key is inserted
(header, query, or cookie). Click **Create** to save the auth method.
Enter a **Connection Name**, verify the **Base URL**, and provide the required credentials (e.g. your API key). If
you want external users to authenticate with their own credentials instead, enable the **Embedded Connection**
toggle.
Click **Connect** to create the connection. The connector now shows the active connection with its authentication
details.
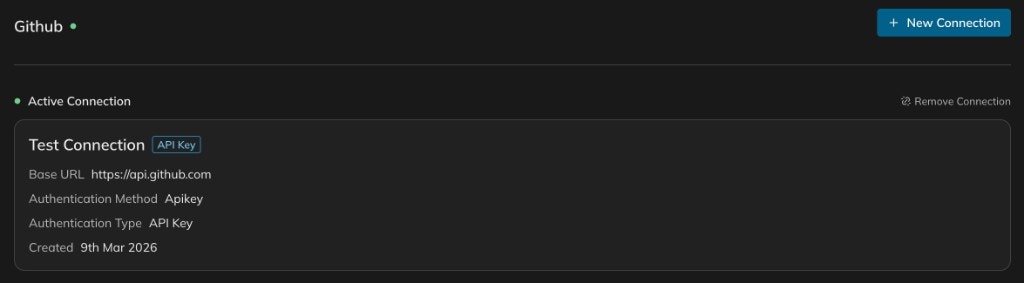 Give connections descriptive names that reflect their purpose or environment — for example, "Production - GitHub" or
"Staging - Slack". This makes it easier to identify the correct connection when configuring environments.
## Setting up an embedded connection
An embedded connection delegates authentication to the external users of your integration. Rather than storing
credentials directly, it defines the authentication method and waits for users to provide their own. For background on
when and why to use embedded connections, see
[Embedded connectors](/latest/guides/getting-started/connect/embedded-connectors).
Open the connector and click **+ New Connection** as you would for a standard connection.
In the **Connection** section of the form, toggle **Embedded Connection** on. The credential fields (e.g. API Key)
are removed because the platform expects each user to supply their own.
That‘s it!
Give connections descriptive names that reflect their purpose or environment — for example, "Production - GitHub" or
"Staging - Slack". This makes it easier to identify the correct connection when configuring environments.
## Setting up an embedded connection
An embedded connection delegates authentication to the external users of your integration. Rather than storing
credentials directly, it defines the authentication method and waits for users to provide their own. For background on
when and why to use embedded connections, see
[Embedded connectors](/latest/guides/getting-started/connect/embedded-connectors).
Open the connector and click **+ New Connection** as you would for a standard connection.
In the **Connection** section of the form, toggle **Embedded Connection** on. The credential fields (e.g. API Key)
are removed because the platform expects each user to supply their own.
That‘s it!
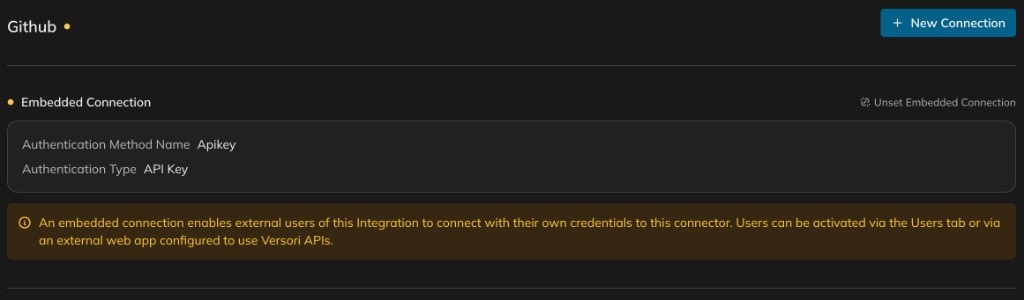 An embedded connection does not function until at least one external user has been activated. Activate users via the
**Users** tab or through an external web app configured to use Versori APIs.
## Reusing existing connections
Once a connection has been created, it appears in the **Existing Connections** list on the connector detail view. You
can reuse an existing connection across multiple environments without recreating it.
An embedded connection does not function until at least one external user has been activated. Activate users via the
**Users** tab or through an external web app configured to use Versori APIs.
## Reusing existing connections
Once a connection has been created, it appears in the **Existing Connections** list on the connector detail view. You
can reuse an existing connection across multiple environments without recreating it.
 Each connection card displays:
* **Linked environments**: The number of environments using this connection.
* **Connection status**: Whether the connection is currently in use by a deployed environment.
* **Authentication method configuration**: The full auth method details including type, header name, and insertion
point.
When you deploy an integration to an environment, you assign connections to each connector for that environment. The
same credentials can be used across environments, or you can create separate connections with different credentials.
## Bypassing authentication
Some APIs — such as public endpoints or internal services behind a VPN — do not require authentication. For these cases,
select **None (Bypass Authentication)** as the authentication type when creating a connection.
Bypassing authentication skips all credential handling for the connector. Requests are sent without any authentication
headers, tokens, or signatures. This is useful when:
* The target API is publicly accessible and requires no credentials.
* Authentication is handled externally (e.g. through a network-level gateway or VPN).
* You are testing an integration against a local or mock API that does not enforce authentication.
Only bypass authentication when you are certain the target API does not require credentials. Using bypass on an
authenticated API will result in failed requests.
Each connection card displays:
* **Linked environments**: The number of environments using this connection.
* **Connection status**: Whether the connection is currently in use by a deployed environment.
* **Authentication method configuration**: The full auth method details including type, header name, and insertion
point.
When you deploy an integration to an environment, you assign connections to each connector for that environment. The
same credentials can be used across environments, or you can create separate connections with different credentials.
## Bypassing authentication
Some APIs — such as public endpoints or internal services behind a VPN — do not require authentication. For these cases,
select **None (Bypass Authentication)** as the authentication type when creating a connection.
Bypassing authentication skips all credential handling for the connector. Requests are sent without any authentication
headers, tokens, or signatures. This is useful when:
* The target API is publicly accessible and requires no credentials.
* Authentication is handled externally (e.g. through a network-level gateway or VPN).
* You are testing an integration against a local or mock API that does not enforce authentication.
Only bypass authentication when you are certain the target API does not require credentials. Using bypass on an
authenticated API will result in failed requests.